Posted on Leave a comment

28-Foot & Shoe Width

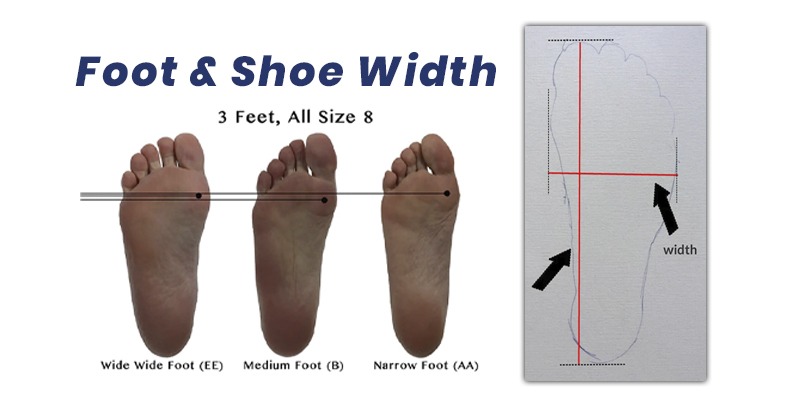
During this lesson, we will study the difference between different widths of feet and, consequently, the width of shoes. Also, here, as we saw in the previous lesson for the sizes in length, different methods depend on the country, so we will try to give an easy way to understand and calculate this width. We will discuss the three major width systems: the UK, the American, and the European. The width is defined as the fitting girth measured around the ballpoints, which corresponds to the foot’s most expansive area, found on the first and fifth metatarsal bone area.
The UK system uses alphabet coding for the width. Letter F for example, is the 6th letter of the alphabet that corresponds to the Normal fit. The French system will use the number 6 for Normal fit, which corresponds to the 6th letter of the alphabet, which is, once again, F. The American system will also use a letter system, and the Normal fit would be the letter B for women and D for men. This means that the regular fit that corresponds for the UK is the letter F, and for the European system, the number 6; for the American system, it would be the letter D for men and B for women. In the American system, instead of D & B, we can use M for medium fit, which is a regular fit.

Now that we know that the number 6 is a regular fit or F or M, we can have all the other widths by counting from 1 to 10, where a smaller number than 6 is always more narrow and larger than six is always wider.

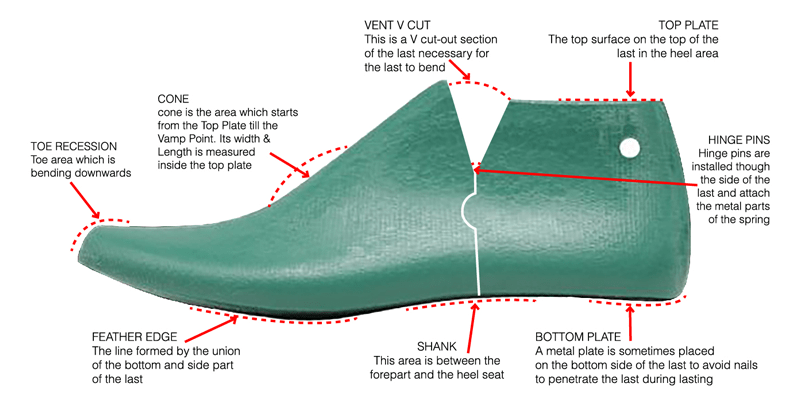
The above table shows technical coding used by shoe technicians, designers, patterns, and last technicians. We will use a simpler version for the general public: N = narrow, M = Medium, and W = Wide. If we have a technician width table, we will notice that the ball girth in a Medium width for the standard last size eight measures 240mm. This table would give you all the widths depending on the shoe size type and for males or females.
To always give a comfortable shoe fit, Italian Footwear Solution will consider a fit between the regular and wide fit, using suitable materials which will embrace the foot but have a relaxed fit allowance. This is what we call the Perfect Fit. You can always trust Italian Footwear Solution for the perfect last for a perfectly comfortable fit.

French Widths: 1 2 3 4 5 6 7 8 9 10
English Widths: A B C D E F G H J K
American Widths: AAAA AAA AA A B C D E EE
Slimmest ++ Slimer + Slimer Slimer Slim Normal Wide Wider + Wider Widest

Posted on Leave a comment

Putting sense in Shoe Sizes!

Everyone should know that wearing the wrong type of shoe or size for a prolonged period will bring serious foot problems with the eventual consequence of ending up in a clinic. Thank God only a few people in a buying position aren’t conscious enough to have the proper understanding of shoe fit and size and don’t even try to find someone who does. As we explained in our previous lesson, there are too many different types of sizes in how various countries measure and transmit the size of their shoes, creating confusion in the consumers’ minds. For example, apart from the UK, EUROPE(Continental or French), USA, and MONDO, there is also the Mexican, Russian, Japanese, and Korean systems.

Let’s study the fundamentals: the UK, EUROPE, and the USA. Firstly, we need to take the base standard size, EU 42 for men and EU 37 for ladies. An EU 42 in men will correspond to a UK 8 and a USA size 9. For ladies, instead, a standard size EU 37 will equal UK 4.5 and USA USA size 6.5.

To get the perfect shoe fit size, we need first to understand how we measure it. A shoe’s size depends on the foot, and to get this, we will need the foot’s measurement in millimeters from the heel, also called the heel point ‘0’ to the longest toe. To this measurement, we will need to add approx. 1cm more allowance to allow the foot movement inside the shoe during the usual walk. On another note, we should also measure the ball girth to calculate the fitting girth. Common commercial standards would be marked as slim, normal, wide, and extra wide fit. In the EU system, the difference in width will be 5.75mm, while it will be 6.35mm in the USA system, and by increasing or decreasing, we say that we vary the grade; but this is not part of this lesson’s objective. Returning to our foot size, it is essential to note that while measuring your foot with our Italian Footwear Solution technical Size Chart, both feet have a different length, so you must choose your longest foot.

In the EU (Continental or French or Paris Point) system, the difference in length from one size to another will be 6.66mm. In the UK system (English Point), the difference will be 8.46mm, and for the USA (American Point), it’s 8.46mm.


Italian Footwear Solution has developed the IFS technical size chart, which can be easily downloaded and printed on a simple A-4 paper. By placing your foot, you will instantly know every time your exact size while buying shoes by simply carrying it with you while shopping. Because our body changes in time and we increase or decrease weight, not to mention our feet are relaxed in the morning and swollen in the evening, it is advisable to take your measurements every six months and in the evening time.

Posted on Leave a comment

History & Evolution of the Shoe Sizing System

Many hundred years ago, there was no size to follow when choosing a shoe because the shoe manufacturer would personalize the shoe by measuring the customer’s foot directly. With the increase in demand, there was the need to industrialize the shoe manufacturer process and so the need for various shoe last sizes in standard volumes.
The UK was the birthplace of the shoe sizing system referring to barley grains. It is interesting to know that three grains of barley equal an inch, then twelve inches would equal one foot, and three feet would equal one yard. In 1887, the USA and UK brought it further, developing half sizes.
In 1586, Flemish mathematician, military engineer, and physicist Simon Stevin published a small pamphlet called “The Tenth,” which was the basis of modern notation for decimal fractions.
During the 18th century in Europe, each nation had its system of units of measurement. This was becoming a real problem in France because of the inconsistency in measuring products and became one of the causes in 1789, which led to the outbreak of the French Revolution. The metric system was adopted at the end of the French Revolution in 1799. On the other hand, shoe sizes in the United Kingdom, Ireland, India, Pakistan, and South Africa, continue using the barleycorn system where one barleycorn equals 1/3 inch.
In the early 1800, French shoemakers invented a new system of measure for footwear which grew from the metric system and was called the Paris Point or, as it is now called, the Europe system, the French system, or even the continental system. One Paris Point equals 2/3 cm or .262 in.
A third scale was introduced in 1970, trying to unify the UK and European measuring system called the “Mondo point.” Instead of unifying, it created a third measuring system extensively used in Asia. This new system indicates the foot length in increments of 5mm.
FUNCTION: The function of the shoe size is to help the consumers choose the right size independently from which part of the world it originated. As we have seen, there is lots of confusion with various types of measurement systems.
The question now is, how do we keep our customers happy with the proper sizes?
Italian Footwear Solution with 3 generations of experience was able to create the Perfect Fit size. Our sizes are always following the true fit of the foot taking into consideration all the important measurements of the feet and making the Perfect Fit last for all our production shoes.
Always get peace of mind when purchasing Italian Footwear Solution shoes with our Perfect Fit size and high-quality materials for the best experience in look and walk.

Posted on 2 Comments

BASIC-Tools for Shoe Making

In this lesson we will study the tools and materials we will need to make a shoe. Of course, we will start with a 1-SHOE LAST, without such, it would be impossible to start. We will also need for example a 5cm width 2-MASKING TAPE to cover our last as we studied in our previous lessons. By covering our last with the masking tape, we are now creating our shoe pattern.
Once we have covered half or entirely our last, we can now mark our pattern points and pattern lines with a pencil to get the exact measurements for cutting our masking tape pattern. We can mark these by hand utilizing different solid and flexible 3-RULERS. We will then utilize a 4-UTILITY KNIFE to cut our masking tape following our pattern points and lines. This masking tape shoe pattern will be lied down on a piece of paper which then be flexible and allow us to study the fit and bring corrections and adjustments to the paper pattern.
Once we are satisfied with our paper shoe pattern, we will place it on a 1mm stiff carton to get our final stiff cardboard shoe pattern which will be placed on top of our leather or material and guide us to cut our upper material.
One important tool is to have a 5-GREEN RUBBER CUTTING BOARD to protect our table and which has all guidelines and measures already marked on it.
The 6-PINCERS will be utilized to pull the leather around the last and give its shape. Another must for a shoe technician is a 7-SHOE HAMMER and a 8-RASP. The hammer is utilized to flatten the leather around the curves, insert nails and bend them around the bottom of the last to hold the leather in place onto the last. The rasp is utilized to smooth the leather beneath the last up to the feather edge flushing it so the bonding between the upper and the outsole will be stronger and the outsole will be more flush with the upper.
The tools of a designer are like the wheels on an F1 race car. You can still drive with bad wheels, but you will never be able to win a race, so choosing the best which fits better to your needs is an essential part of good design practice. It is also as important to always keep them handy and tidy in the same place. Like my mentor would always tell me… “Everything in its place” … and his shoe factory would look cleaner than most hospitals. In the chaos of shoe-making materials, production line, and logistics, in his shoe factory, you could find a needle because it would always be in the same place.

Posted on Leave a comment

Terminology of the Last – 4/4

LAST DIMENSIONS

In our final last terminology, we will talk about important Points and Construction Lines which are very essential in shoe designing since we will need these measurements in order to make our shoe making pattern designs. These lines and points will vary depending on the type of shoe we wish to construct but, in this lesson, we will talk in general which then will need to be adapted to various types of shoes.

If we draw a line in the middle of the last, dividing the last in two (Lateral; small toe side and Medial; Big toe side), this line will be called the Main Axis.

Lateral and Medial Ball points can easily be found since they are the widest part of the last and divides the front and back part of the last called “Front part and Back Part”.  An easy way to find this point is to flip the last upside down and place it perpendicular to your table so the part of the last which touches the table is your Ball Point.  This point can be marked on the feather edge on both sides.

The Vamp Point is located on the Main Axis moving forward from the Heel Curve going forward and located at 50% of the men’s bottom last length and 75% of the bottom last length for the lady shoe.  By drawing a line around the last by uniting the Lateral Ball Point to the Medial Ball Point and passing by the Vamp Point on the top of the last, we will get the Ball Girth Line.  The Ball Girth Line is one of the most important measurements since it will give the shoes a comfortable fit or a tight painful fit.

The Low Lateral Instep Point is a point situated exactly at 50% between the Vamp Point and the Ball Point. 

The Counter Point is positioned in the Main Axis on the Heel Curve.  In order to find this point, we can measure the width of the back Cup Heel bottom then bring this length starting from the back feather edge going upwards along the Main Axis.

The Back Height or Quarter Height is a point marked on the centerline of the back curve which is 10mm above the Counter Point.

If we draw a line from the Low Lateral Instep Point to the Counter Point on both sides, we will get the Lateral Quarter line and Medial Quarter line.

At 70mm to 75mm above the Vamp Point, following the Main Axis towards the Cone, we will get the Instep Point. The Instep point can also be found by drawing a 90-degree line upward; also called the Instep Guide Line, starting from the middle of the Quarter Line reaching the Main Axis.

The Collar Opening is made by drawing a curved line from the Instep Point to the Counter Point.  This collar opening will be higher or lower depending on the type of shoe we are designing.  If the collar opening is not well calculated, it will rub against the ankle bone causing pain during walk.

Posted on Leave a comment

Terminology of the Last – ¾

Now that we have learned in our previous lessons most of the last terminology, we can now talk about the last dimensions which are very important in order to design our shoe pattern. The last dimensions are also important to communicate with the last manufacturers and to explain dimensions in finished shoes. Even though in the shoe store only the length and width are described, with a last we need to know different width and different lengths. The volume taken around the last are said girth measurements.

In the previous lessons we talked about heel seat and toe point. The distance between these two with a measuring tape is called Standard Last Dimensions.

By measuring the circumference around the line from the widest part of the last on the inside ( medial ball point ) and the outside of the last ( lateral ball point ) we will get the volume of the BALL GIRTH. This measurement will make the difference slim, normal, wide and extra wide fit.

The INSTEP GIRTH is a very important measurement since it will make a shoe comfortable or tight and painful in the instep area of the foot. We measure this volume by wrapping the tape from the shank around the last cone and back to the shank. This position is where the top of your foot presses against the vamp of the shoe. Too tight and it will pain. Too loose and shoe will move around too much.

The volume in midpoint between the Ball Girth and the Instep Girth is called the Waist Girth.


TOE SPRING is the measuring height from the ground to the tip feather edge of the last. As a general rule of thumb, the stiffer the outsole, the higher the toe spring. The more flexibles’ outsoles instead will have less toe spring since this flexibility will create it naturally during the walk. A military boot for example will have a stiffer outsole and so an increased Toe Spring. A sneaker having a very flexible outsole will have almost no toe spring.

TOE BOX HEIGHT is the height measured from the feather edge to the top of the last at the big toe position.
Long Heel Girth is measured from the top heel counter point to the vamp point on the main axis.
Short Heel Girth is measured from the bottom heel counter at the feather edge to the instep girth crosses the main axis.
Heel Height is measured from the heel seat to the ground. A flat shoe will have 0 and high heel 100.
Stick Length is the length measured from the toe tip to the heel curve.
Bottom Length is measured by putting the measuring tape at the bottom side of the last from the tip feather edge of the last till the heel curve feather edge following the main axis.
Ball Width is the measurement at the bottom of the last from the medial ball points to the lateral ball point which is the widest part of the last.
Waist Width is measuring the width of the bottom last at 25mm behind the ball width.
Instep Width is measuring the width of the bottom of the last at 25mm behind the waist width.
Heel Width is measuring the width of the bottom of the last at 25mm behind the instep width.
Cuboid Width is the measurement of the largest point of the back heel part.
Cone Length is the longest side of the top plate.
Cone Width is the measurement of the cone at 90% of the cone length.

Posted on Leave a comment

Terminology of the Last – 2/4

image

The high heel last will have a different terminology due to the fact that we need to consider the height and angle of the heel. During technique designing, the heel seat which holds the heel of the shoe will be calculated to have the correct height and inclination of the last.

• Wedge Angle: This angle depends on the height of the heel. The higher the heel, the greater the ankle.
• Heel Curve / Back Curve: The heel curve is the back part of the last starting at the feather edge all the way up to the top plane.
• Toe Point: The front of the last at the tip is called the Toe Point.
• Center Axis: The center axis is the line dividing the last in two from the toe point to the heel curve.
• Tread Line: This line goes from one medial ball point to the lateral ball point below the last.
• Tread Point: This point is the crossroad between the center axis and the tread line.
• Breast line: this is the line where the heel starts and ends in the back feather edge.
• Shank area: This is the area between the tread line and the breast line.
• Heel Seat: This is the the back section of the last from the breast line to the back feather side.

Posted on Leave a comment

Terminology of the Last – 1/4

The terminology of the last is important because each specific part of the last has its specific function. If we pass a line from the toe area to the heel of the last in the middle, this line is called the Main Axis which in return divides the last in Medial (large toe) and Lateral side (small toe). Another imaginary line can be made in front and back of the BALL POINT. This ball is the largest part of the forepart of the last which is caused by the junction of the 5th metatarsal-phalange joint on small toe and 1st metatarsal-phalange joint on large toe. The area in front of this ball point is called the FORE PART and behind the BACK PART.

• CONE: is the area which starts from the Top Plate till the Vamp Point. Its width and length is measured inside the top plate.
• HINGE SPRING: This is a metal spring placed inside the last which allows it to bend, so facilitating the insertion or removal from the shoe.
• VENT V CUT: This is a V cut-out section of the last necessary for the last to bend.
• SIZE MARK: Each last is marked with size on the Top Plate which needs to be read from top during lasting.
• THIMBLE: A cylinder hole allowing a metal cylinder to be inserted to help the bending of the last.
• TOP PLATE: The top surface on top of the last in the heel area.
• TOE RECESSION: Toe area which is bending downwards
• FEATHER EDGE: The line formed by the union of the bottom ad side part of the last.
• SHANK: This area is between the forepart ad the heel seat.
• BOTTOM PLATE: A metal plate is sometimes placed on the bottom side of the last to avoid nails to penetrate the last during lasting.
• PLATE WINDOWS: Openings can be made on the metal plate to allow the attachment of nails onto a Tack Hole Plug.

Posted on Leave a comment

BASIC-Ankle boot vs Short boots vs Knee boots

The difference between different types of boots depends on the difference heights of the back upper side. When the back profile ends at the height more or less at the ankle bone, then we talk about an Ankle Boot. These Ankle Boots are in reality winter shoes with an upper covering the leg above the foot reaching the ankle. This height measurements are calculated not on the esthetic point of view but for it’s proper functionality. In a female ankle boot in size 37, it is usually 12cm while in men boot in size 42, it would be around 14cm. These sizes can be modified for esthetic reasons but the danger consist when lowering the boot leg height under the ankle bone, it could rub at this point and cause pain during walk. In order to facilitate the entrance of the foot, different systems can be used like zippers on the side or back part of the boot, we can also have elastics or even laces. One of the most important measurements of the ankle boot is the heel girth. The ankle boot can come in various styles like derby, oxford, laced boot or a classical Chelsea having elastics on the sides. Often to help fit these kind of boots having no zippers or laces but only side elastics, a back puller is positioned on the back top profile which is used for pulling the boot upwards.

Regarding the low boots also called low cut boots, which again depends on the height of the boot leg which is between the ankle boot and the boot will have the back profile always above the ankle going towards the knee. Because the leg will also have to fit, a system of laces or zips will have to be part of these boots. This means that in all the low boots the ankle bone will always be covered. This can vary from 16cm to 28cm depending on the style. As we already saw with the ankle boot, the heel girth in the low boot plays a very important factor in the good wearability of the boot. The heel girth is the measurement of the circumference between the heel and top profile which is at least 32cm in a 37 size shoe for women and at least 36cm in a 42 size shoe for men. A specific type of low boots would be called pullup boots which got inspired by the cowboy boots and biker boots. These have the characteristic of having no opening to help fit your foot so the heel girth must be higher by 1 or eve n1.5cm more than a more traditional one and so they should be relatively easy to wear. To additionally help the fit, there usually are two pullers on the side of each half pair to help pull up the boot. In order for the foot to easily slip in and out even after the foot tends to swell at the end of the day, the ankle girth is extremely important and so, instead of the traditional 12-12.5cm girth width, should be at least 1cm wider.

The boots also called knee boots, is characterized by the fact that it covers the leg right until the knee. Usually, the height in a shoe size 37 will be 38cm. An easy formula would be the shoe size + 1cm but this is only average since it will always depend on the creativity of the designer. In the boot we have apart from the heel girth, the ankle girth, the calf girth and finally the top bootleg girth. The designers can play with the width in these measurements but never the height position. The boot leg in the knee boots, tends to have an inclination called bootleg spring which should reflex the natural inclination of the leg. In case of riding boots and motorcycle boots, the inclination will be forward towards the toe and instead for normal walk it will be towards the heel.

Lastly we have boots with bootleg covering the knees and above called high cut boots. These kind of boots are usually made of more elastic materials which helps the wearability.

There are also many other type of designer boots like sandal boots or clog boots, which we can categorize as hybrid boots which is not the scope of this basis lesson.

FUNCTION: Initially the boots were made to keep the entire foot and leg warm in cold weather but then apart from its main function, today it has become a fashion footwear were which follows the traders of the designers imagination.
Italian Footwear Solution has always enshured comfort wearability in all its boots manufacturing ensuring all the correct measurements are respected following a standard fit. Our main goal weather we produce shoes or boots is always to give the wearer the most comfortable experience while designing fashion trends.
One shoe fits all approach does not work and we understand that the most important thing is to always start with a perfect last which has a comfortable girth measurements and then build our fashion designs around this base. You can rest assure that Italian footwear solution will always work with best technicians and utilize best materials to offer a beautiful esthetic shoe having in addition a perfect most comfortable fit.

Posted on Leave a comment

BASIC-Loafer vs Moccasin

The difference between a loafer and a moccasin can be quite confusing since they both look very similar but there are important differences which distinguishes them apart.

The best definition for a loafer is a type of shoe without a fastening, that a person’s foot slides into. It is a Casual shoe made of more pieces and a heel. Loafers can also be called open shoes or slip-ons.

The best definition for a moccasin is a formal shoe made of soft leather, a heelless shoe with the sole brought up the sides of the foot and over the toes. A moccasin will always have a flexible outsole making you feel like walking almost barefoot. Moccasins were footwear that was widely used by Native Americans especially hunters and traders.

The most basic and easy way to spot the difference between the two is that moccasins are the ones with laces and are heelless, while the loafers have a heel and are without laces or any fastenings. But don’t confuse the laces on a moccasin with the ones on a regular pair of shoes. These laces are primarily for decoration purposes and do nothing else apart from that.

Because of its characteristics, a moccasin is a shoe that is made of any soft leather like deerskin. It also has the characteristic of having the leather of the upper going from top then around the foot covering it completely.

The loafer is not a shoe for everyone since it does not have laces so we cannot adjust the fit but needs to be lucky enough that our foot girths will be in the average range of people since manufacturers will be using a average last for size grading. The loafer is made of a Vamp which covers the sides and front part of the shoe, an apron which is stitched directly to the vamp and goes upwards finishing in the tongue and often a saddle covering the instep top part of the apron. In certain occasions you will see decorative tassels placed on top of the saddle.

There are different types of loafers; when a whole piece of leather is used without splits it will be called a whole cut loafer. If the top part is stitched but still one piece it will be called a whole cut fake moccasin. It is called fake moccasin because the apron is not stitched onto the vamp to hold them together but only for decoration since it is a whole piece of leather. Sometimes to give a better allowance of fit, an elastic inserts can be added between the vamp and the tongue in the instep area. In a whole cut loafer if the material is elastic like a woven fabric or woven leather, we can reduce the the volume space of the shoe since the material will adapt more to the wearer.

The moccasin is the only shoe where the upper material wraps the foot by under and is stitched on the top part to the apron. Because of this type of construction, the moccasins are one of the most comfortable and flexible shoes on the market. We have two type of moccasins; In the pre-punched moccasin, each components is already punched so it makes it easy to stitch them together. The second type of moccasin is sown onto the last manually. This is a much more elaborated type of tubular moccasin since the technician will sow the vamp and apron together by hand using only his experience and craftmanship.

FUNCTION: The Loafer is an easy slip-on shoe and is best suited to be worn with jeans, shorts and any casual dress or suit. This does not mean you cannot wear also with a more formal look but usually it is a comfortable shoe with comfortable casual wear. The moccasin on the other hand is a more formal shoe to be worn together with a suit for office wear but also here we this type of shoe can be versatile with a more casual look. All depends on the style of the moccasin or loafer.

Italian Footwear Solution always discuss with our customers to understand perfectly their needs in order to give them a perfect match for the occasion in which the shoes will be worn. We have a wide range of moccasins and loafers to suit everyone’s needs. As we always say, the foot should not adapt to the shoe but it is the right shoe which needs to adapt to the correct function of the wearers foot. One shoe fits all approach does not work and we understand that the most important thing is to listen to our customers, then fulfill their requirements and working together with best Italian technicians and materials to offer a beautiful esthetic shoe having in addition a perfect most comfortable fit.